It’s been 2 years since content groupings first made it into Google Analytics, but it seems like this incredibly beneficial feature is still quite underused and poorly understood even among people otherwise familiar with the software. That’s why I decided to write a two-part guide of which you’re reading the first one – how to setup content groupings. Part 2 is available here: Using Content Groupings for User Flow Analysis in Google Analytics.
Content Groupings vs Content Groups
Now, Content Grouping lets you group your site’s content into a logical structure that reflects how you think about it. It allows you to view and compare aggregated metrics by group name.
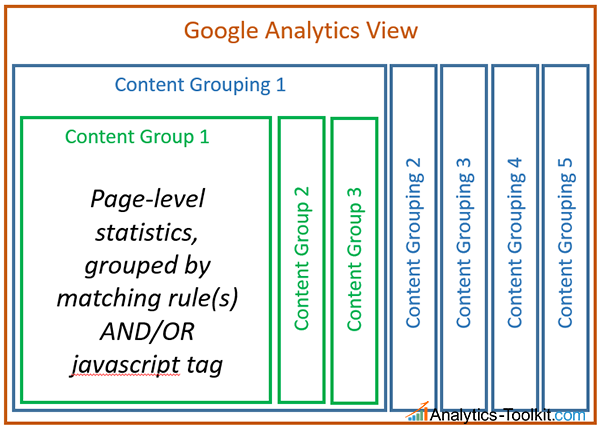
To better understand the relationships between groupings and groups, let’s see how it looks schematically:

Content grouping is set on the view level and you’re allowed no more than 5 content groupings per view, which is plenty for most cases. A content grouping is a collection of content groups. I always start with a content grouping called “General” or “Main”, which contains between 10 and 20 high-level content groups that include 95%+ of all pageviews in them (why 95%+ is explained in part 2). Let’s say one of these groups is very deep and it’s interesting for you to have a breakdown of that into groups. In general you’d want to keep it as a single group in the high-level grouping and to break down the its different subsections in groups in a new content grouping.
There is no limit to the number of groups you can have in a grouping, but I’d generally advise against content groupings of more than 40 groups in them for reasons that will again become clear in Part 2 of this article.
Planning the Content Grouping

Creating content groupings and groups shouldn’t be done lightly, as they are not retroactive, exactly like view filters. Changing already defined groupings or groups should be done only when there is a very good reason to do so – changes in the URL structure, addition of new sections to the site, etc. I suggest you have a good plan on what the groupings would look like before you continue on to the setup step.
The different content groups usually follow the navigational structure of your site (site flow) – e.g. each section or subsection (navigational tree branch or sub-branch) is a group. Taking a typical e-commerce site as an example, one might consider these examples of a high-level content grouping:
Group 1: Homepage (this is a group many people forget!)
Group 2: Category Listing Pages
Group 3: Individual Product Pages
Group 4: Cart Pages
Group 5: Checkout Pages
Group 6: Contact Us Page
Group 7: The whole About Us section, including FAQ, Terms, Policies, Payment/Delivery Info, Returns etc.
Group 8: Payment Complete / Thank You Page
Group 10: Site Search Pages
Group 11: Account Management Pages
Group 12: Blog Pages
Is this grouping perfect? Does it fit all cases? Certainly not, as each site is unique, but it’s a very good starting point for most e-commerce sites. How it might be different for your site? Maybe you’d single out registration/login pages as a separate group, maybe you have just 2-3 main categories and want these as separate groups even in a high-level grouping, it’s all your choice, but remember that you want this to be high level.
An example of a second grouping I’d do if I’ve set up the above example as my first is a grouping where the categories are broken down – one group for each category listing pages and one group for each category’s individual product pages. Some products may fall into more than one category, which is an issue, since content groupings don’t allow that – content groups withing a grouping are mutually exclusive.
Creating Content Groups Using Rules
When you start creating your first grouping, you’ll be prompted for a name. Don’t sweat too much on it, just make sure it’s informative. You can change it later with no repercussions.
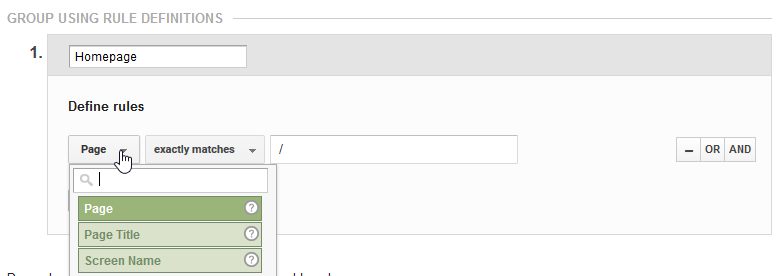
If you have a decent URL structure, e.g. your URLs have a directory-like structure that follows the logical sections of the site, this is a very quick and easy to use method for defining content groups. Especially if you know some RegEx you should have no issue doing all your content grouping work using rule definitions. Here is how it looks in the interface:

As you can see groups can be defined by using the page URL (Request URI), Page Title (meta title) or Screen Name in the case of mobile apps. Please note that content groupings, similar to goals, work on the filtered values of these fields. So if you have any filters modifying those values in some way – make sure to take that into account in your rule definitions by making use of the different match types. For example, if you have a filter for appending the hostname to the URL, make sure your rules either include that or are set in a loose way – e.g. “matches regex” or “contains” rules instead of “starts with” or “exactly matches” rules. Also make sure to think about content groupings when setting up new filters – check to see if the group definitions still work as expected.
The best way to check if a rule is working as expected is to simply apply it to the All Pages report as a filter, like so (for the above example):

You can use a combination of OR and AND rules to define a content group, but with a well structured site and/or sufficient RegEx skills you’ll rarely need to construct rules with more than one line of definition. If you do so, make sure to test them with an exactly mirrored filter on the All Pages report.
Defining Content Groups Using the Tracking Code Method
The tracking code method is useful if you have your IT team’s buy-in and can have changes implemented on the site you’re working on. It is to some extent more robust, since given the tags make it through, they will continue to work regardless of any URL changes, Title Changes or filter modifications. It’s also easier to implement groups via tracking code for highly heterogeneous URLs that are too hard or impossible to capture with a RegEx.
![]()
For the method to work you need to complete two steps. First, turn tracking code ON and select an Index. Make sure to select a separate index for each content grouping (Google Analytics does no checks on this selector!). Save the configuration.
Now you need to send the instruction to your IT guys and make sure to have the code placed after the ga(‘create’ … ) line and the pageview hit line – ga(‘send’, ‘pageview’); . If you’re using Google Tag Manager there is a special Content Groups menu in the standard Universal Analytics tag that you should use and the data will need to be sent by setting it up in the dataLayer before the trigger that fires your Google Analytics pageview tracking (usually that means placing it before the GTM container tag).
Working with the e-commerce tracking example – you would want to set to group name to “Blog” on all blog pages, “Cart Pages” on all cart pages, “Checkout Pages” on all checkout pages, etc.
Defining Content Groups Using Extraction
Defining groups using extraction is fairly straightforward, but not so useful as far as my practice go, which is why I won’t spend much time on it. If we go back to the e-shop example above and the second content group, where we want to have all category listing pages to be split – one group per category and our URL structure allows it, we can do something like this:
Example Category URLs:
/category/pink-widgets/
/category/pink-widgets/?page=2
/category/blue-widgets/
/category/blue-widgets/deep-blue-widgets/
We can write the following extraction rule:
/category/(.*?)/
This would result in one content group being created dynamically for each category, meaning that in the reports, given the URLs above there will be 2 content groups: “pink-widgets” and “blue-widgets”, which will contain stats for all four URLs listed above.
Rule Order & Combining the Methods
The grouping logic is applied to your data sequentially on both the method level and the in-method level. That means that Google Analytics first applies the tracking code method and groups the current pageview according to the tracking code. If the page was not grouped according to a tracking code value, then it applies the extraction method to the pageview hit data. If the page was not grouped at this point it starts applying the rules method, starting from the rule at position #1 and proceeding down the rule stack, until it finds a match or reaches it’s end. If you need to, you can use all three methods within a single content grouping.
An example of combining two methods would be if you have bad URL structure for your individual product pageviews, but a workable structure everywhere else, e.g. your product URLs look like that: site.com/fluffy-pink-bunnies-123.htm and your category listing URLs look like that: site.com/bunnies-345.htm . Tagging this via regex may be impossible or it will be unreliable at best, so what you can do is set up the code tracking method on the individual product pages and use the rule method for all other pages. Thus if only category listing pages and product pages have [0-9]\.htm at the end you will have only the category listings left out when processing reaching the rule stage and thus you can safely assign those URLs to the category listing group.
Testing Your Content Grouping Implementation
The easiest way to live-test tracking code implementations is to use a tool like the Recordings feature of the Google Tag Assistant Chrome plugin or the Analytics Debugger Chrome plugin on the pages you’ve set up. If you’ve used extraction or rule definitions, then you should wait for some data to gather and then go to the All Pages report and apply your content grouping. It’s best to wait a full day after you’ve set up or changed your content grouping, before checking. First, select your grouping:

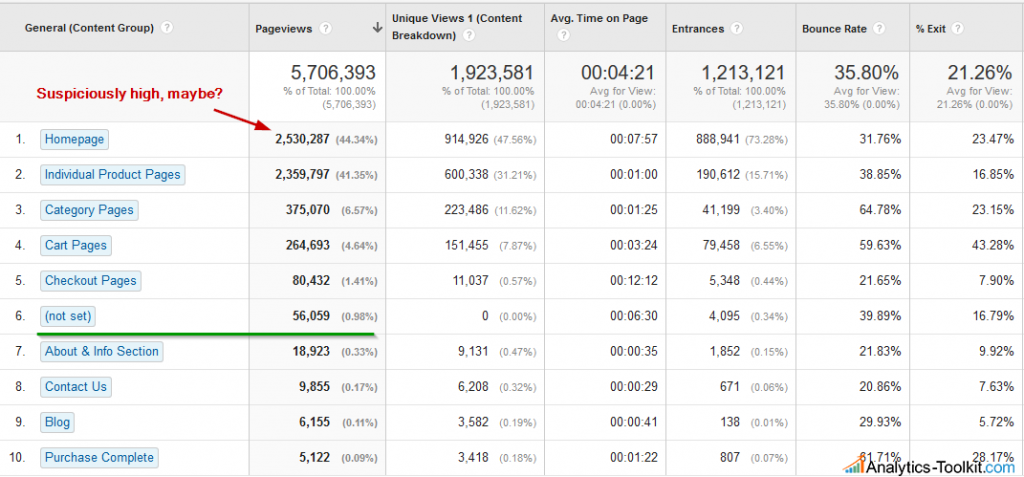
Then check if values for each group make sense. Click on groups to see if the pages in them are the ones you want to be in. Pay special attention to the “not set” group, as it contains all pages that weren’t grouped elsewhere.
If it has a high percentage of views for your high-level grouping it’s an indication that you either failed to capture important parts of the site in your grouping during planning, or that your group rules would need fixing. Here is an example where we have accounted for most pageviews in our grouping (99%), but maybe the homepage group pageviews look a bit too high?
(click for full view)
Just click the group name to see what URLs are in it and decide whether it’s fine as it is or there is a rule/tracking code mistake you need to address.
So, we learned how to plan a content grouping, how to define content groups using the three methods available and also how to check if our setup is good. If you enjoyed the article make sure to continue reading to find out great ways to utilize your setup here: “Using Content Groupings for User Flow Analysis in Google Analytics“.


I believe you are incorrect about what the “not set” data means. This doesn’t indicate the Grouping is not working. I think it simply shows pages that fall outside of the current Grouping that’s being filtered in a given GA report. I could be wrong.
Hi James,
Thank you for noting this.
If you read carefully, you’ll see that that is what I am saying as well: ” Pay special attention to the “not set” group. If it has a high percentage of views for your high-level grouping it’s an indication that you either failed to capture important parts of the site in your grouping during planning, or that your group rules would need fixing.”
If it’s 1.) it means your rules simply didn’t encompass enough of the site’s pageviews, making the content grouping less useful in practice.
If it’s 2.) it means you did intend to capture a high percentage of pageviews, but failed to do so due to an error in one or more of the group definitions.
In all cases (not set) encompasses pages that fall outside of the current grouping. I just wasn’t as explicit about it and looking back maybe I should have been. I’ll add that do the text.
Cheers,
Georgi